+

Product
Solutions
Resources
Company
Partners
+

.svg)
Blog posts
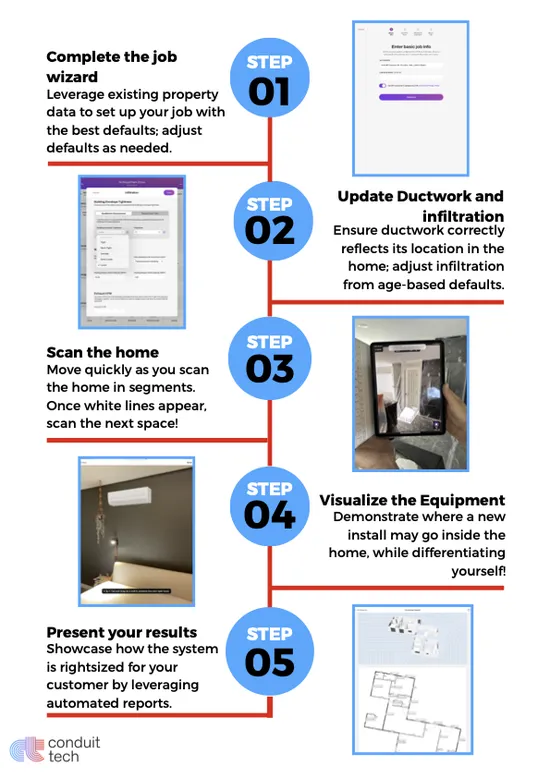
Revolutionizing HVAC Design: A 5-Step Guide to Conduit Tech
Revolutionizing HVAC Design: A 5-Step Guide to Conduit Tech
Conduit Tech compresses hours of design work into a single home visit. But getting the most out of the platform means understanding how each step builds on the one before.
Here's how the process works from the moment you walk in the door to the moment you close the sale.
Everything starts with the scan.
Using the LiDAR sensor in your iPad Pro, you'll walk through the home capturing each room. The scanner measures dimensions, identifies windows and doors, and builds a complete 3D model as you go.
What you're doing: Walk slowly and steadily through each room, keeping the iPad pointed at the walls. The screen shows you what's being captured in real time—white lines indicating surfaces the scanner has mapped.
How long it takes: Most homes take 10-15 minutes to scan completely. Larger or more complex layouts may take slightly longer.
Tips for better scans:
Why it matters: The scan replaces tape measuring. Instead of writing down room dimensions, window sizes, and door locations by hand, you're capturing everything digitally with greater accuracy. This data feeds directly into the load calculation.
Once the scan is complete, you can show homeowners exactly what new equipment will look like in their space.
What you're doing: Using augmented reality, you place virtual equipment—mini-split heads, outdoor units, thermostats—into the actual rooms. The homeowner sees their living room with a wall-mounted unit right where it would be installed.
How to use it: Select the equipment type from the app, then position it on the wall or floor where installation makes sense. The visualization scales correctly to the room dimensions from your scan.
When to use it:
Why it matters: Homeowners struggle to imagine what they haven't seen. Showing them a realistic visualization of the finished installation removes uncertainty and builds confidence in your recommendation. It also prevents surprises on installation day.
The scan captures geometry. This step adds the construction details that affect load calculations.
What you're doing: Reviewing and adjusting the building characteristics—wall construction, insulation levels, window types, ceiling heights, and ductwork location. The software pulls default values based on property data, but you'll confirm or correct based on what you observe on site.
Key inputs to verify:
How to approach it: You don't need to open walls. Use visual clues—age of home, window stickers, attic inspection if accessible, homeowner knowledge of past upgrades. When uncertain, the defaults based on construction era are reasonable starting points.
Why it matters: A load calculation is only as accurate as its inputs. Room dimensions from the scan are precise. Building characteristics require your judgment. Taking a few minutes to verify these details produces results you can stand behind.
Now you show the homeowner what their home needs and why.
What you're presenting:
How to present effectively:
Why it matters: This is where you differentiate from competitors who show up with a clipboard and quote a price. You're showing data, demonstrating expertise, and proving your recommendation isn't arbitrary. Homeowners buy from contractors they trust, and transparency builds trust.
Everything you've captured flows into documentation that serves multiple purposes.
What's generated automatically:
How to use it:
Why it matters: The data you captured for the sale does double duty. It supports your installation quality, streamlines permit and rebate paperwork, and creates a record you can reference for future service. One scan, multiple uses.
The five steps flow naturally during a single home visit:
Total time on site: 45-60 minutes for a complete design consultation and proposal, versus multiple visits with traditional methods.
The contractors seeing the best results aren't just using Conduit Tech as a measurement tool. They're using it as a sales tool—a way to demonstrate expertise, build trust, and close deals in a single visit.
Ready to see the five steps in action? Book a demo and we'll walk you through the entire process.
.svg)


Copyright 2025 Conduit Tech, LLC. All rights reserved. Terms and Conditions Privacy Policy
Your Privacy Choices Do Not Sell or Share My Personal Information